


I'm obsessed with Martha Stewart's Yellow Gold glitter. In the past year, I've used it for so so many projects. So, when faced with Craftyminx's craft supply challenge this week, I immediately knew that I would be using this glitter in this specific shade.
I had no idea what I was going to make sparkle in the beginning of the week. I thought about doing picture frames, vases, and Dave had even suggested doing something with origami. But, I wanted to do something fresh and exciting, maybe even a little risky.
I was sitting in my studio staring blankly at the wall waiting for an idea to come to me. Nothing happened. I threw in the towel and was ready to give up when my kitten ran into the room (that she isn't allowed in) and hid under the work table. In trying to catch her, I bumped into the wall pretty hard and my Holga fell off the shelf that I store all of my toy cameras on.
I remembered Elsie Larson's painted Holgas, and the episode of Martha Stewart where they painted shoes with glitter and Mod Podge and immediately began taping off the edges of the camera.
I decided to make a little tutorial, so you would be able to make your own.
Ready? Let's go!
You will need:
-a holga camera (you can find them on eBay for less than $30)
-painters tape
-mod podge
-glitter
-a paint brush
-a craft knife
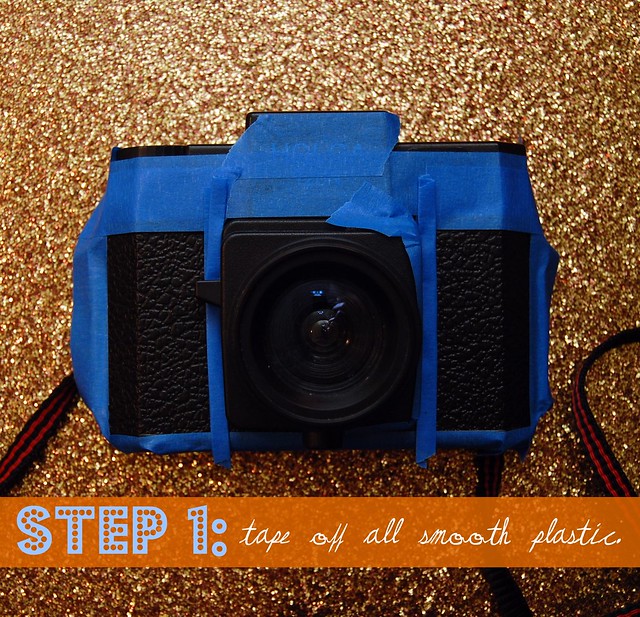

Step 1:
Separate the front and back pieces of your camera. Using painter's tape, tape off all smooth plastic. We're going to be painting on the textured areas only.
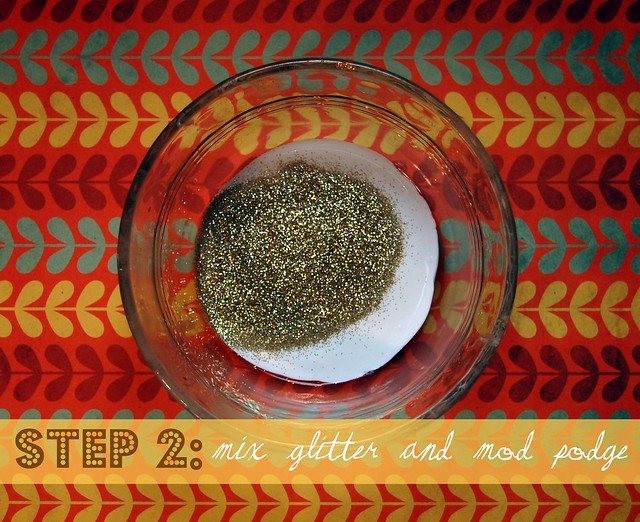
Step 2:
Mix glitter with Mod Podge. Martha's site suggests two parts glitter to one part Mod Podge, but that wasn't enough sparkle for me. I ended up using a mixture much closer to 1 to 1.


Step 3:
Paint mixture onto exposed areas of textured plastic. Make sure that you've coated it evenly and wait for each coat to dry, if applying more than one coat. Allow to dry for several hours, overnight would be best.
Step 4:
Remove the tape! HOWEVER, be super careful. The Mod Podge creates a film, and if you rip the tape off quickly the Mod Podge will peel off and ruin all of the work you've done. I suggest using the craft knife at this point to gently trace around the edges of the tape before beginning to peel it off.

And that's it!
You have a golden holga! Awesome right? One more thing in my house is gold and sparkly. I just wish I could con Dave into letting me make a glittered wall somewhere in the house.
This is my second submission in CraftyMinx's "Craft supply Challenge" and I would LOVE it if you would go vote for me!!!!

Are you going to make one?
13 comments:
love it!
vote casted. done and done.
This is such a cute idea! This is the first glitter one I've seen!
So clever...I love this!
Yes! I love this, it's so fun! I voted, woo!
I love that! Thanks to the kitten!
Voted for ya.
Such a clever and cute idea! Off to vote now! ^_^
Looks so rad. Now all i need is a holga to try it with.
Gorgeous- love it, voted!
Oh so golden and sparkly - how could anyone resist? I voted for you too! What an awesome project Robbie! And how wonderful that a naughty kitty led you to the idea - I really think all creative ideas should start this way! :)
Legit awesome. I have to go dig around for my holga now.
dave should let you have a glitter wall....
Oh! It looks so neat! Love its.
Totes voted, too!
Totally love this! I tried to do this once but I only had rubber cement! It did not work very well, I should say.
thanks for the inspiration to try again :)
Post a Comment