


After I made all of those tissue paper flowers, I realized I had nothing to put them in. I mean I have big vases and dainty little ones, but nothing that suited them. I really wanted to be able to keep them in the studio, but I need a vessel.
I was sitting in class when inspiration struck, drinking a bottled Frappucino because the cafeteria was out of coffee (there was no way I was going back without caffeine!). I love the look of antique milk bottles, but don't have any. The bottle was the perfect shape, but kind of boring.
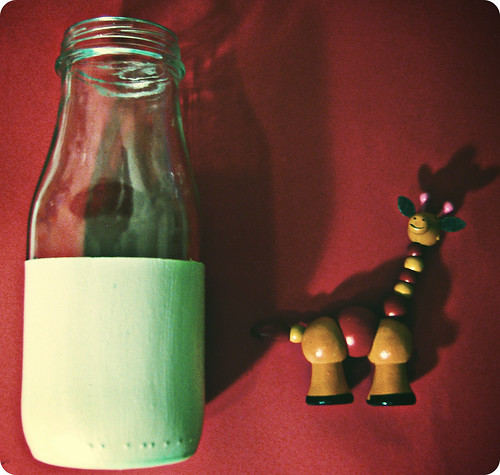
This was my solution:
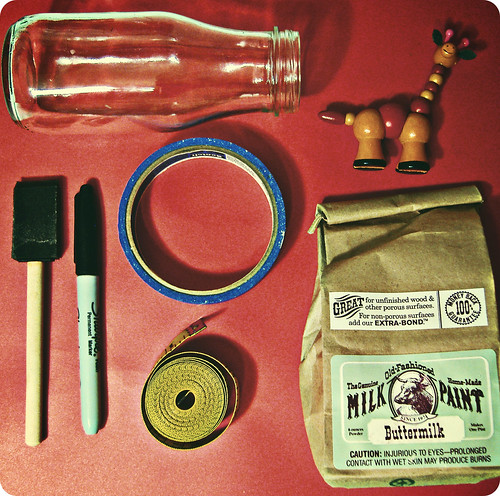
-A glass bottle or jar
-Painter's tape (or whatever)
-A paint brush
-A marker (don't use a sharpie!)
-Measuring tape
-Paint
-A tiny giraffe (to play with while the paint dries)
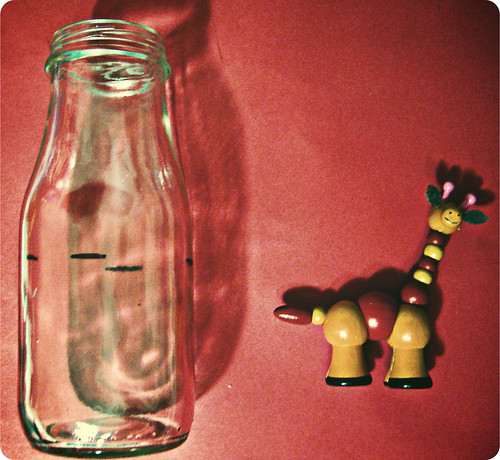
1. Measure the bottle from the bottom up and mark it in a few spots. Don't use a permanent marker (you'll have to scrub the bottle with clorox clean-up to get it off, and in the process you'll ruin your sweet blue button down that fits really well). I measured 2.5 inches, but you can do whatever.

2. Place tape around the bottle, using the marks as a guide. Stare at the giraffe.
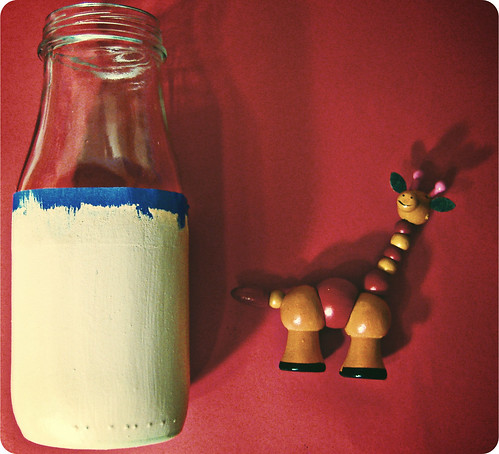
3. Paint the bottle up to the tape. I used milk paint because that was what I had, but I guess you could use something else? Seal the paint with Mod Podge (why does that stuff get "chunky" after a little while?). Talk to the giraffe about your feelings while the paint dries.
5. Peel off the tape. Immediately show your significant other what you have done. Point out the flaws, and make him fix them (scrape off the sloppy bits, where you went over the tap,e with a razor blade). Stare at the giraffe.
And that's it!!!
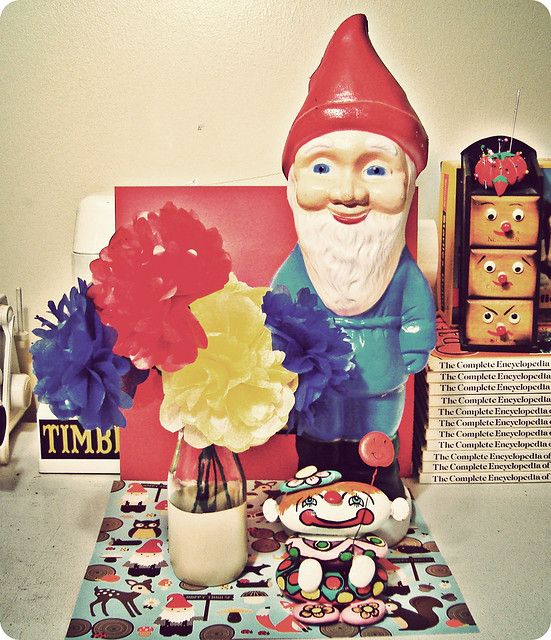
Toss a handful of stuff from your pockets (change, marbles, buttons and lint) into your new vase. Arrange the tissue paper flowers you've already made carefully, like a those "floral artists" on Martha. Say something that makes you sound professional.
"The vibrant hues of the peonies are complimented by the neutral vessel. This will create a 'pop of color' when placed in groups, down the center of a dining table. Your guests will marvel at the kinder-crafts which you've created and this will, in turn, distract them from the fact that you are serving Ellio's frozen pizza as an entree."
Have Fun.
Make Stuff.
<3
Robbie.
Coming Up...
...and so much more!
7 comments:
I think these will look great in my new kitchen! Thanks for the great idea <3
AHA so good. Also milk paint?! I've never heard of that but I love that. it looks good. ALSO Good for a kid who says "theres oil paint under my nails, wheres the turpentine?" and glazes furniture in a closed, small room. whatevs.
that gnome seems to love it too.
I have tons of bottles I don't know what to do with. Maybe I should stop collecting them? Hmm... Anyways.. this is a great idea and I love how you only went halfway up. It looks so modern yet vintage.
I love how you only went halfway up, gave it a modern look. I have a bunch of bottles that I now know what to do with! Thanks for the idea!
just found your blog from Freckled Nest..hi!
This is an awesome idea, I'm definitely going to dig up some glass bottles and try this. I want that giraffe!
Excellent idea! I think stripes would be fun too. Thanks for sharing.
I am interested in the giraffe component of this project. Does it have to be a giraffe or can it be another animal?
Post a Comment